Search This Blog

Friday, June 26, 2015

Home Is Where the Heart Is: How to DIY a little state pride

Home Is Where the Heart Is:
How to DIY a Little State Pride


About 2 years ago, my husband Tony and I picked up and moved ten hours away from everything we’ve ever known. Though we absolutely love where we live now, we both miss home and our families every day. My hubby and I have Tennessee state flag stickers on our cars, Vols t-shirts, and TN croakies, koozies, and keychains, but as our anniversary approached, I wanted to surprise Tony with a piece of home that would be a focal point in our home together.

So what did I do? I opened up my computer and went straight to Pinterest. I shudder to think about the crappy gifts we all sent before Pinterest. (I’m kidding, of course, but seriously, how did we have creative thoughts before Pinterest?!) I searched home state decor and finally ran across a “state yarn art” pin. I loved it. As I looked more into this project I found that there was more than one way to create these works of art:


So I read several how-to’s, made a list, and headed to Lowe’s. The whole process took me about a day and a half, and the result has gotten me some of the most wonderful compliments of any decor in our home. If you’ve seen similar projects before and wondered how to pull them off, I’ve outlined here the steps I took to create a large-scale version of a Tennessee state yarn portrait that could easily be translated into whichever state or shape you’d like to create.

Buying the supplies you’ll need
First, I visited my local Lowe’s for some supplies. I headed to the lumber section and found an associate to grab me some 2x6’s. If you want to create a 4 foot long, 1.5 foot tall plaque like I did (great for long shapes like the state of Tennessee), Lowe’s sells 2x6’s in 12 foot lengths that you can ask them to cut into three pieces of equal length. If you would like a plaque of a different size, they have all kinds of different options for you to choose from, but what I recommend is getting a few pieces of wood that can be cut and put together like mine, not just a piece of plywood cut to size. I have seen projects done with plywood, either stained or painted a certain color, and they just do not have the “wow factor” that stained wood planks have. Smaller projects can use 2x4’s or 1x6’s, just as long as they are untreated lumber. You will be putting a stain (or paint, if that’s what you’re in to) on them, so there is no need for them to be treated.
Also, lots of posts on wood DIY’s advise you to ask Lowe’s associates to cut your lumber for you. Yes, they can do this. What I have found, however, is that depending on the quality of the Lowe’s (or any other home improvement store) you visit, not every set of employees will volunteer to cut your lumber for you, or be “so helpful” about it, as I found that many pinners say. Sometimes, especially on a busy Saturday, you will have to wait around on an associate to come over and help you get the lumber down from the rack, and then you may even get an eye roll when you ask if they can cut it to a specific size for you. These guys are used to working with contractors, and when see someone who is very obvious a “DIYer” standing in their lumber aisle, they assume that us silly women most likely have no idea what we’re looking at, talking about, or needing to purchase, so just be prepared for that.

After purchasing your lumber, head over to the painting section and pick up a stain. For my project, I used Rustoleum Ultimate Wood Stain in dark walnut (Here's the link!). You can choose whichever color best suits your decor, but for me the walnut created a nice, rich finish, while still allowing the wood grain to pop. The smallest size, 32 oz, I believe, was more than enough even for a large project like mine.


Then, you’ll need some glue to hold the boards of wood together. I used Gorilla Wood Glue (Here's the link!) and it has held up wonderfully! No nailing needed whatsoever. This really helped me to achieve the seamless look I was going for, with no nails sticking out all over the place.


Next, you’ll need to head over to the hardware section to grab some tacks. These will serve as the outline that you’ll attach the yarn to on your project. The ones I purchased are ¾ inch escutcheon pins in brass. They had a few different colors (silver, gold, brass) and sizes. Just make sure the pins are an appropriate size for your project (ie: don’t buy 6 inch tacks for a 1 foot by 1 foot plaque, silly!) (Here's the link!)


Finally, you’ll need a medium-sized paintbrush if you don’t have an extra one at home, just big enough to fit inside the can of stain, and a plastic drop cloth to avoid staining your floors in the process (the cheapest one will do).

Now load up your car and head home, but stop by a craft store on the way. You’ll need some yarn to fill in your state. I headed to the sewing/crochet department and bought off-white yarn that is not too fuzzy, more like string. Choose any color you’d like. I only bought one skein, or bundle, of yarn at first and had to go back for another. Go ahead and buy two or even three just in case. Extra yarn always comes in handy around a DIYer’s house!

Getting your supplies together
Once you’ve got everything home, start by spreading that dropcloth out and laying out all your supplies on top:
  • Boards of whichever size you chose
  • Wood glue
  • Tacks
  • Hammer
  • Wood stain
  • Paintbrush
  • Yarn

You’ll also need:
  • Hammer
  • Measuring tape
  • Computer with a printer
  • Scotch tape
  • A little patience

Putting together your beautiful work of art

  1. Your first task is to glue your boards together. Decide what sides of the boards are prettiest and should face out. I like for the knots and intricate swirls in the wood grain to be on display, but if you would like to have a more uniform look, then make the more irregular sides face down. Check to make sure that each of the boards line up with each other along their sides. You may have to switch around the order of the boards to do this.


  1. Now, take your gorilla glue and squeeze a line along each edge that needs to be bonded in a zigzag pattern. Push the boards together and wipe away any glue that squeezes out with a paper towel. If you have giant clamps, clamp the boards together while they dry. If you are a normal person, like me, without a fancy woodshop, then push these boards (still on the drop cloth) against a wall and stack some heavy textbooks or anything extra-heavy against them to hold them there nice and tight. Let the glue dry for 6-24 hours; 6 hours if you need to have this gift done to surprise your husband who lives in the same house as you, and you only have this one day off before your anniversary, and you know that there’s no where in the house that you can hide a 4-foot block of wood in your house; 24 hours if you are under less constraints.  

  1. Give your can of stain a good shake for a few minutes. Once it’s good and mixed, open it up begin spreading the stain in an even coat with your paintbrush.


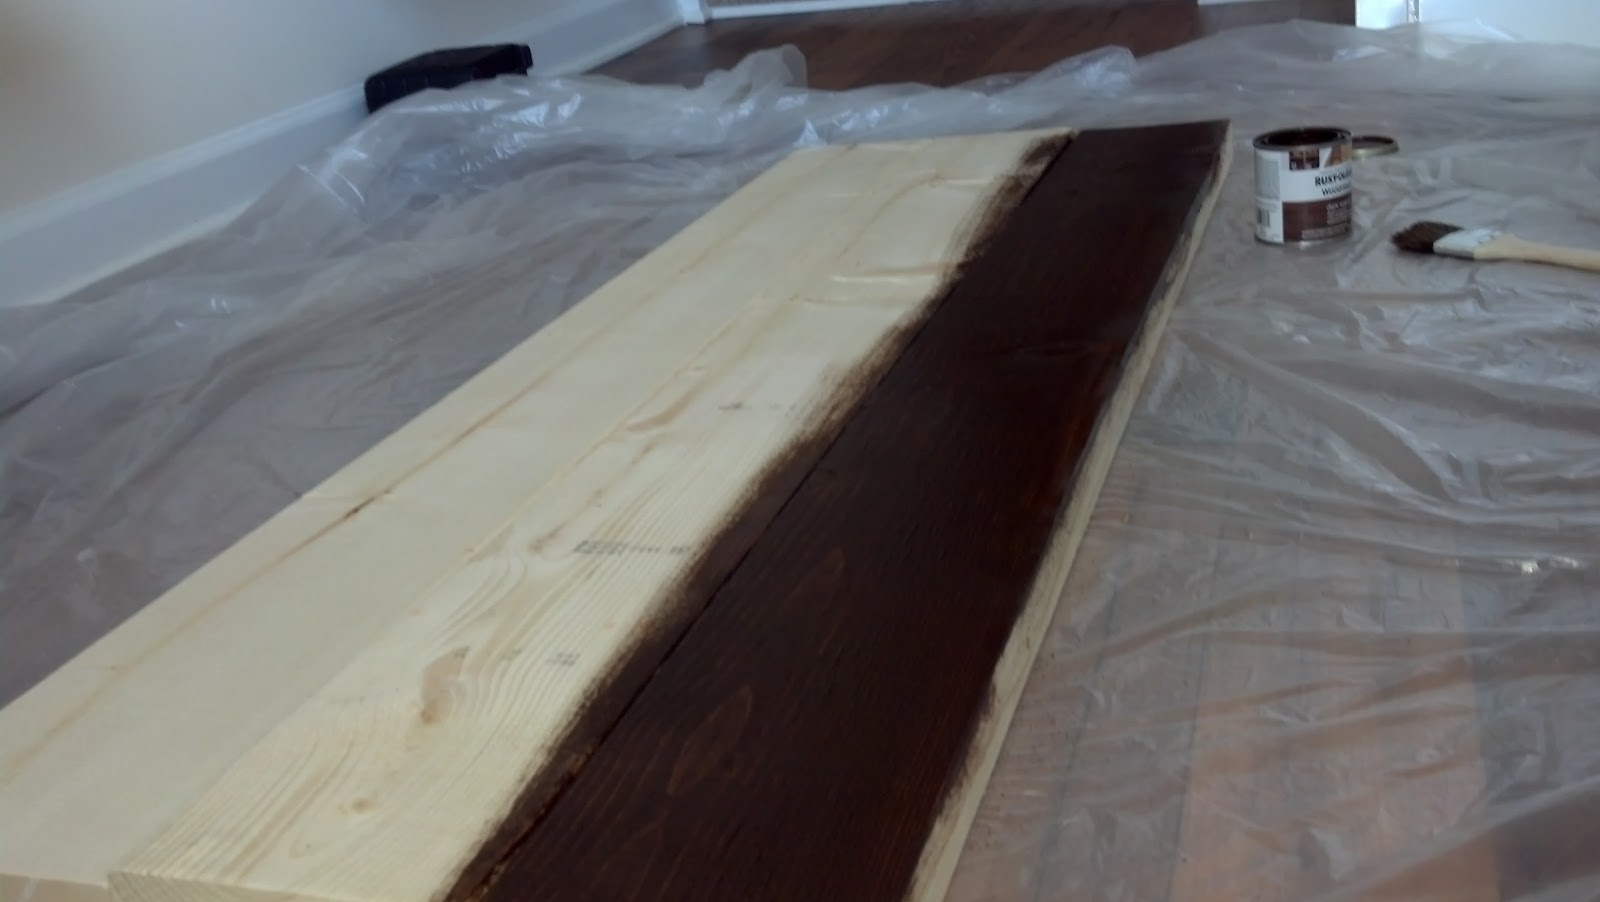
  1. Stain the front, sides, and top and bottom of the plaque. It’s up to you if you want to stain the back. I did not because I knew I was going to have it against a wall, so the back would not be seen. As you stain each board, wipe any excess stain gently with a paper towel. This will ensure that you have a nice even coat and that the wood grain shows through. Give the stain time to dry, according to the directions on the can.

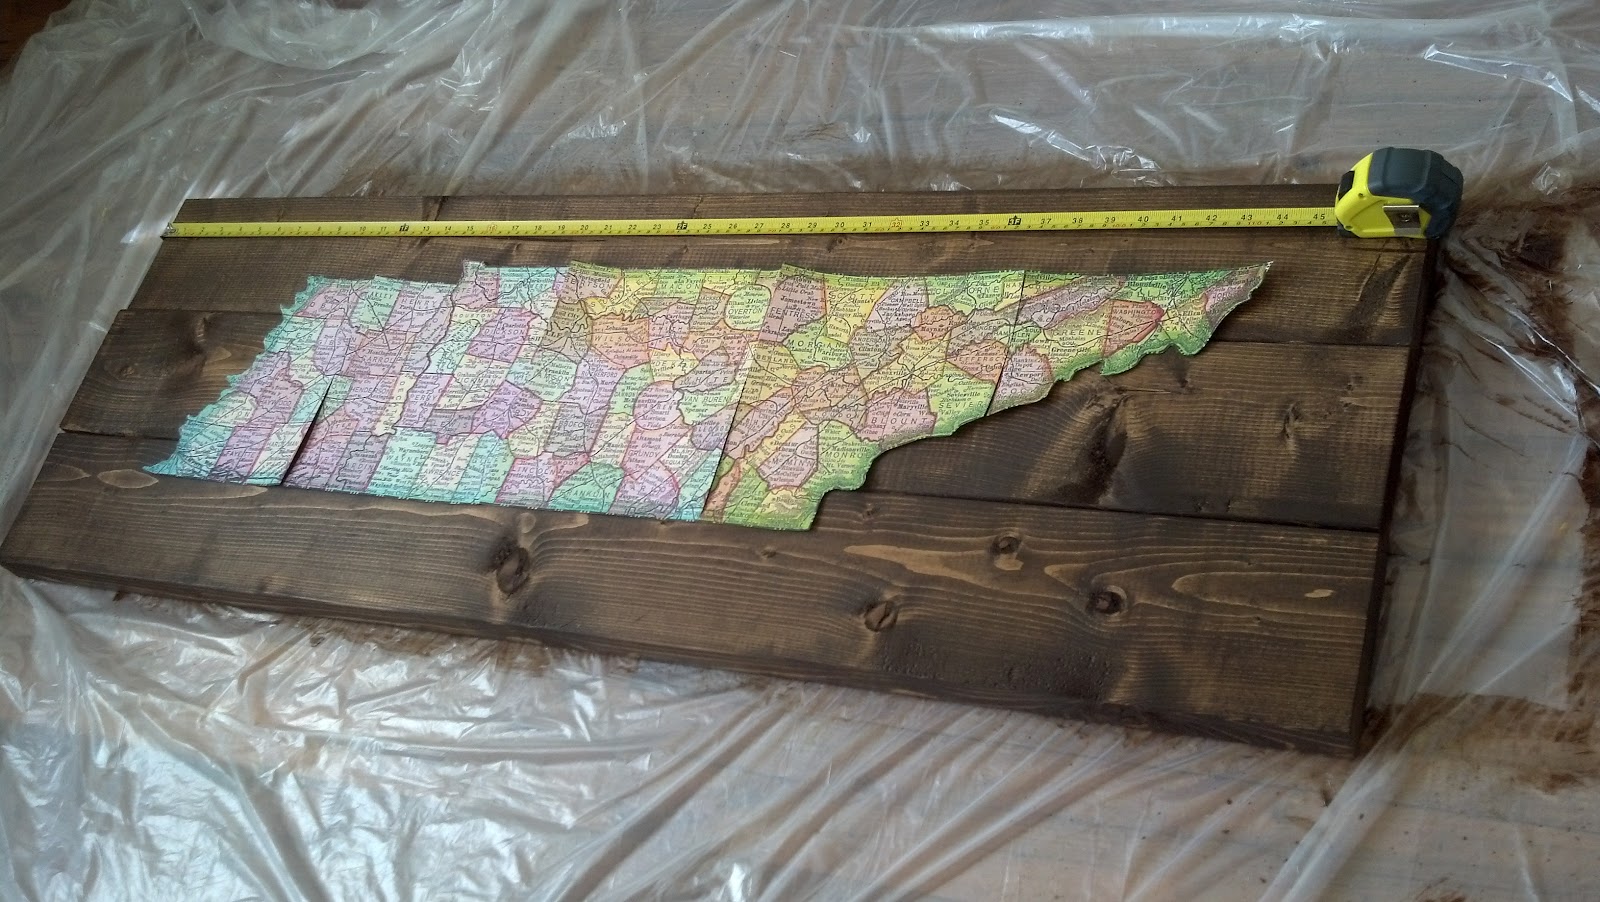
  1. Now you need to search for the image you’d like to put on your plaque. Use google images, and select one that is a high number of pixels (ex: 2700 x 600). This is the number that pops up on google images when you hover your mouse over the image, or when you click on it to show a bigger version. If you want to use a Tennessee image, this is the one I used.

  1. Print the image out on multiple sheets of paper, using Microsoft Publisher’s banner creation settings. Cut out the image and tape the sheets together. Lay your image out on your plaque and secure it with a rolled piece of tape on the underside of your cutout. Use a tape measure to center your image juuuuust right.


  1. Hammer the tacks around the outside of the image, leaving the width of one nailhead between each tack. I’ll be honest with you, this part is the longest step, especially if you are doing a large project like mine. But trust me, the work will pay off. I’ve seen similar versions of this project that leave wider gaps between each nail, and therefore use less nails which takes less time, and the result is less detailed, more elementary looking, and just doesn’t have the custom appearance that it will with more tacks.

  1. When you have completed the outline, remove the printout. Make note of where you would like the heart in the middle of your image. You can position it anywhere. I positioned ours over our hometown. (If you are doing an image other than a state, you can leave out the heart and simply zigzag the yarn from one side of the image to the other.) Use a pencil to freehand the outline of your heart on the wood.


  1. Nail tacks into the outline of the heart that you drew and get ready to start stringing that yarn!

  1. Tie one end of your yarn to one of the nails on the main outline. Take that string and pull it to one of the nails that make up the heart. Wrap the string once around that nail, then return it back to the next nail on the main outline. Continue this pattern of once around an outer nail, followed by once around a heart nail. There are many less heart nails than there are main outline nails. This means that you will have to loop around each heart nail several times, but each main outline nail only once. If you run out of yarn, simply tie on a new piece to the end of the first skein of yarn.


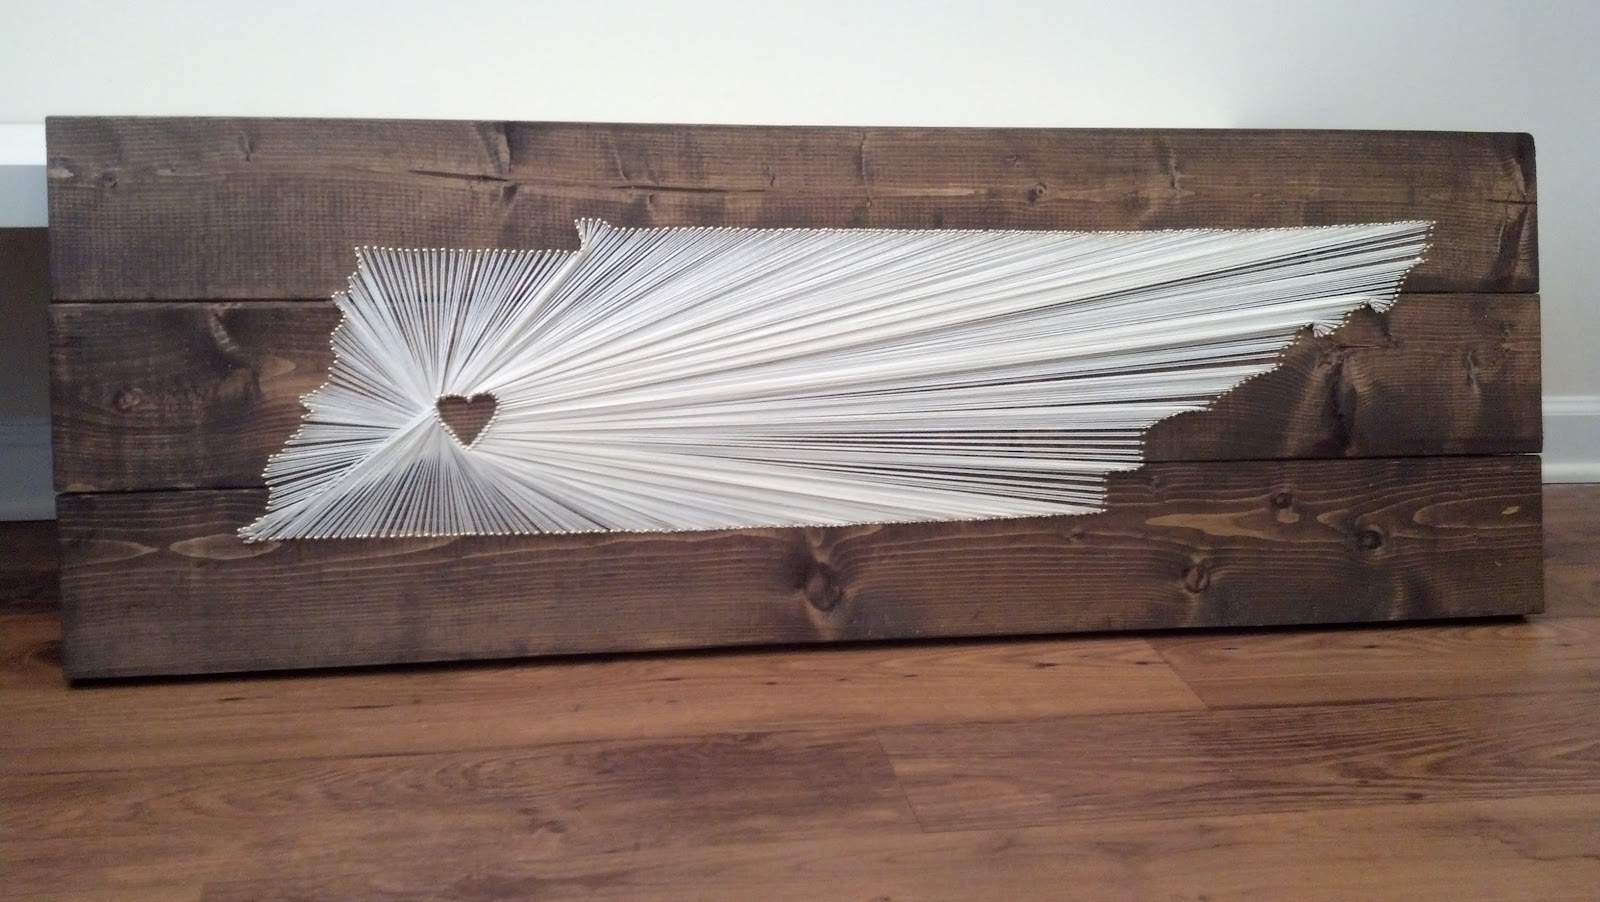
11. Enjoy your gorgeous work of art!

I hope you have enjoyed this DIY. I’m certainly not the one of this duo that is generally considered the creative or decorator-savvy one, but as I have gotten so many wonderful compliments on this piece, as well as questions on how I made it, I thought I’d share it with you guys. This plaque is a beautiful reminder to me every day that it pays off to not just pin good ideas you see on Pinterest, but to make them! If you have any questions on making your own, please leave a comment.


Wednesday, June 10, 2015

Marriage is Changing Me {Here's How}

Marriage is changing me


Before I walked down the aisle and into one of the most life-changing journeys of my existence thus far, I never once actually considered the magnitude of what I was signing up for. I thought college had been hard, having roommates sometimes proved difficult, and working in teams a challenge. In highschool, I thought sharing my bathroom space with my older sisters took strength. I also thought my experience with past relationships made me qualified for the job.

What I did not know, however, is that marriage itself is like an emotional bootcamp for the soul. I do not think this is a bad thing- because boot camp can be looked at as a tough journey full of end rewards, which is exactly how I view my marriage.

I have been married for {almost} two years. We moved in together a little over a year before our wedding. We had our son about 6 months before we moved in together. In a way, I thought a lot of our relationship has roughly been a marriage. Walking in to my marriage I felt prepared. I thought that  since we were basically already married, nothing would change. I now see how ignorant I was to the unity that marriage brings, and how much it does alter your relationship once the vows are read and paperwork binds you both together into “marital bliss”.

“If it wasn’t hard, everyone would do it.. the hard is what makes it great.”

I believe, in the age of social media- that we are forced to believe that there are couples out there that are absolutely perfect. No, I don’t post every argument my husband and I have on facebook- but I also don’t pretend to be something we are not. What are we? Two imperfect people who have built a solid foundation in our marriage- one that we work hard on every single day and do our best not to neglect it.

This week, I want to share with you the ways in which marriage has changed, and is continuing to change me as a person. I am sharing the honest truth, because I never like to be fake about anything- because hiding the struggle also hides the strength and greatness of life’s journey. I hope by sharing this in an honest and raw way, that you will be able to relate, and relax, in knowing that no single person or person is perfect and that we all have to alter ourselves in different ways for the one we love- and maybe you share some of this same challenges, silly or serious, as well.

  1. I’m perfect. He’s not.

My husband will probably be the first to agree that I still struggle with this concept. No, I do not actually think I am perfect and that he is the only flawed person in the relationship. However, I see things my way and I have a really hard time when someone challenges me on this. Luckily for me, I married someone who will challenge me against this mindset at every turn. I spent years in relationships where I would end up running all over someone because they either a) didn’t think it was worth it to stand up for themselves or b) actually thought I was the one always right {yeah, I find this hard to believe, too}.
“I am right. He is wrong.”- seriously this it is an almost IMPOSSIBLE pill to swallow for me when I have to admit aloud to my spouse that I realize that I am the one being a little ridiculous. In my mind, my brain is saying “Shut it, leave it alone, stop while you’re behind”- but my mouth will absolutely not let this happen. I just keep going, trying to prove my point {even if my mind has already established that he’s the one that’s right}. I go on and on until my defenses don’t even make sense anymore.  Until it is a full blown fight. Most of the time this occurs in the car. We still cringe a little when we know we have a long car ride ahead, and I will admit that I am usually the instigator here.
So, how has marriage changed this in me? trial and error. Even a year ago, I would never so openly admit my bullheaded, instigative ways. I am not perfect- and so, I have not perfected how to stop my mouth from starting fights, or my brain to ONLY think one way. But, I see my growth in the right direction- and I even admit when I am wrong… sometimes. ;) This may not seem like a very big deal to anyone else- but these are giant steps for me!

2. I don’t have to apologize.
I’m never wrong, so why would I need to apologize? Also, apologizing is giving him the upper hand, so why would I do it? - In the beginning of our marriage, this was my very own personal recipe for disaster. I even went so far as to when I didn’t get an apology, and instead just got silence, I would CONTINUE the argument until one of us were forced into false apologies. It made for some very hurtful conversations- that we would both regret later, and eventually apologize for DAYS later {despite the advice we both knew in “never go to bed angry”}.
I have learned that marriage is not a game- and the upper hand game is now void. Marriage is an equal partnership- and it is one that you both have to equally work for consistently. For the first year of living together, and even 6 months into our marriage, this was something we both struggled with. It took us quite some time to put our guards down, and learn that when we argue we have to apologize for the things we did wrong, and communicate to each other what hurts us, and what was originally bothering us. Arguments cannot fully be prevented, and as bull-headed as we both are, they will continue through our marriage, but we have truly come a long way now that we have strengthened our “argument fixer skills”.

3. I’m a good communicator.

I THOUGHT I was a good communicator- but I was 100% a very sucky communicator- and I am still learning. The most helpful thing that has helped me prevent arguments, or at least end them early, was learning my husband. Living together, and knowing your are binded together for life, forces yourself to see your spouse for who they REALLY are. Dating alone allows you to ignore some of the most important communication issues that can occur in your relationship. In dating, you are both putting your best foot forward, but in marriage you can’t always be ON- and in so, you are forced to learn how your spouse communicated, how to react to some of their social cues effectively, and how to best communicate to them. I think the absolute biggest thing here is realize that you no longer live only for your own happiness- you live for your husband’s happiness as well- and communication plays a huge role here.
I have always prided myself in talking to people- it has been a major part of every job I have ever had. But communicating to your life partner/roommate/husband/father of your child/ the man who just worked 12 hours with a sinus infection can prove to be a major challenge- especially when you’ve been chasing your son for hours, while studying for an exam and cooking and cleaning all at the same time. I’ve had to learn to pay a lot of attention to my husband, and who is he, and what he needs from me when it comes to communication. As with every section, I am still learning, but we’ve both come so far. For example, we don’t bring up bills after work at the dinner table, and we don’t bring up past arguments during a current argument. We’re building on our list of effective communication with each other. Marriage is forever- so we have lots of time to keep improving.

4. I don’t nag.


Even I can’t help but laugh a little at that statement. I nag… a lot. It is actually completely on accident.. once I get started my mouth just won’t shut. up.

In the beginning of our time living together, I was a lot worse about this. When we moved in, I wanted him to know he had a partner in the cleaning, cooking and laundry. But, then I started to hold it against him when he didn’t jump up right away to help me clean dishes, or when he continued to sit and watch tv while I folded HIS shirts. I would take that moment to explode into this frenzy of WHY AREN’T YOU HELPING ME?! Spoiler Alert: this never ended well for either of us.
My husband works long, hard hours- and I have to really take that into consideration when thinking about what I really expect from him. At the end of the day, I see how selfish my little explosions were. He barely had 20 minutes of relaxation and here I come, storming in, ready to take his mood straight down with mine. My explosions went on for a good while, usually once every month or so. They always led to a big fight that could have been avoided in the first place. It was absolutely miserable for us, and I always regretted it right after I started it.
Learning eachothers communication ways, and being a little more considerate with my husband’s feelings has come a long way here. I know I can’t throw a tantrum when I am elbow deep in dishwashing detergent and my blood is boiling. I finally came to him when we were having a good conversation, and I voiced how I felt about being equal in the chores, and what I needed help with. He got the chance to tell me how he felt about things that bothered him, too. We both kept our attitudes light, and our defenses down- and we survived the conversation. It’s not to say that we both don’t need reminders, but that’s an easier conversation to have.


5. It’s my money. But his money is our money.

This is still a really hard thing for me to get over. My husband actually supported me in quitting my full-time job, and returning back to school to get my bachelors in nursing. So basically, he is the ONLY bread maker in the house right now (I now work part-time, but still). I used to nag him about spending money for his lunch instead of taking leftovers, in order for us to save money. From an outsider's perspective, I am sure it is super easy to see how selfish that is- seeing as he is the one that made the money in the first place.
Not only did I try to control HIS spending habits with HIS money, but if I ever had extra money (like christmas or birthday money, or part-time money) then it was automatically MINE and he had no right to voice his opinion on how to use it.
What was my logic here, you might ask? I was being selfish. That’s what. Even though I have gotten better, I still have to remind myself that we have to come together and decide as a team the best way to spend OUR money.


6. We spend enough time together.


We’re not the couple that spends every possible second together- it’s just not in us. We’re both wired to be independent and we both enjoy time to ourselves. However, we have learned that we must make it a point to spend one on one time together- whether it’s watching our favorite show or buying groceries together. We’re not always in town at the same time, so it’s important that we stay connected with each other.
I didn’t used to think this was very important. I assumed we spent enough time together, and continued to just focus on studying and everything else in my life. There were more than a couple of times that I put our relationship on the back burner unintentionally. Thank God my husband voiced how he felt about it, or I probably would have continued on like it was all hunky-dory.
Another mistake we make is assuming the time we spend together WITH our friends counts as time together as a couple. That is absolutely wrong in our case- because time spent with our friends usually means the guys hanging out in one room, and the girls chatting it up and watching the kids in another room- we get little to no actual time spent together.
Having children can pose even more difficulty in this area- because we spend hours upon hours chasing them around- and by the time everyone is fed and bathed, and the little one is put to bed, you don’t have any energy left for your spouse.- my husband doesn’t accept this as an excuse, and he shouldn’t have to. The day we said “I do”- I was making a promise, in so many words, to make my husband one of my top priorities- and I should hold myself to it.
If we haven’t spent enough time together, you can sense the disconnect between us. We’ve learned we have to have a few common interests (usually we find this in shows- because it’s pretty obvious that I won’t be turning into his next hunting partner anytime soon). We have to make one another a priority.


All in all, marriage has made me realize that it’s no longer just about me- or just about me and our son- my husband has to know that he is just as important. He needs to know that he is heard, and that I make our home a happy place that he wants to come home to. I continuously have to remind myself to put the selfish Brittany aside, and make room for new priorities. It’s very obvious that we are not perfect, and that we have a long way to go- but we are willing to work together and continue to make improvements on the foundation we’ve established so far.

I hope that this blog proves to you that couples are not always perfect, and that we are all human in our marriages. We don’t need to flaunt all of our problems and fights- but we shouldn’t feel like we have to pretend that we are absolutely flawless either!